How to Build a Sauna Outside A Complete Guide
Building an outdoor sauna really boils down to three big phases: figuring out the perfect spot and heat source, laying a rock-solid foundation, and finally, putting the structure together. If you nail the initial planning, the rest of the project just flows so much better.
Your Backyard Sauna From Dream to Plan
Imagine this: escaping to your own private wellness retreat, just a few steps from your back door. Building that dream outdoor sauna is more achievable than you might think, and I'm here to walk you through it. We'll cut through the noise and focus on what actually matters for a great build, whether you're a seasoned DIY pro or looking for a top-notch kit.
This isn't just a niche hobby anymore. The move toward home wellness is exploding. In fact, the residential side of the sauna market is huge, making up over 56% of all installations worldwide in 2023. It's clear people want their own private space to relax and recharge, rather than heading to a public gym or spa.
Starting Your Sauna Build
Your journey starts with two fundamental decisions: where you’ll put it and how you’ll heat it. Getting this planning stage right is absolutely essential. We’ll dig into how to find that perfect spot that gives you both privacy and convenience, and I’ll break down the real-world differences between a classic wood-burning stove and a modern electric heater.
This simple flowchart lays out the first critical steps you'll take.
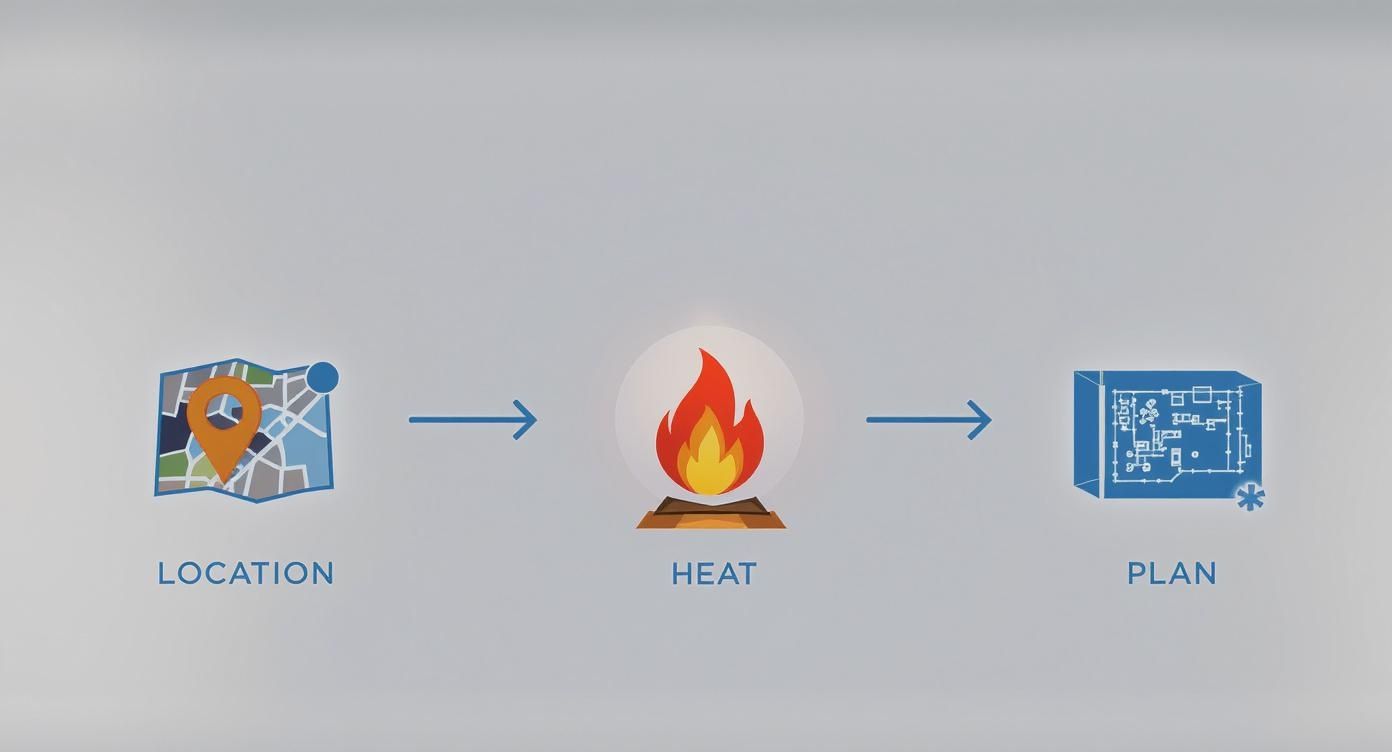
As you can see, locking in your location, picking a heater, and finalizing your plan are the bedrock of a successful build.
Finding Inspiration and Quality
As you start picturing your finished sauna, it pays to look around for inspiration. Check out different styles and materials from high-quality brands like Thermory Saunas to get a feel for what’s possible.
Of course, budget is a major piece of the puzzle. It's smart to get a handle on the numbers early on. For a detailed breakdown, take a look at our comprehensive guide on real-world sauna installation costs: https://vitalitysaunastore.com/blogs/news/sauna-installation-cost
Before you start swinging a hammer, let's quickly map out the big choices you'll be making.
Key Decisions for Your Outdoor Sauna Build
| Decision Point | Key Considerations | Pro Tip |
|---|---|---|
| Location | Proximity to your house, privacy from neighbors, access to electricity or plumbing, level ground. | Walk your property at different times of the day to see how the sun and shade move. This can impact your sauna experience. |
| Heat Source | Electric for convenience and control; wood-fired for a traditional, rustic experience; infrared for a different type of heat. | An electric heater is the go-to for most people. It's just simpler to install and use, especially if you want to hop in on a whim. |
| Size & Layout | How many people will use it at once? Do you want a changing room? Consider bench height and placement for comfort. | A 6'x8' sauna is a great sweet spot for 2-4 people. It provides ample room without being excessive to heat. |
| DIY vs. Kit | Building from scratch offers total customization but requires skill. Kits simplify construction and ensure a professional result. | For most homeowners, a quality kit is the better route. It takes the guesswork out of the engineering and material sourcing. |
Thinking through these points upfront will save you a world of headaches later on.
If you value exceptional quality and a straightforward process, an American-made outdoor sauna kit is tough to beat. You'll avoid the guesswork and the quality control issues that often come with cheaper, imported options.
For a premium experience from start to finish, we highly recommend exploring the saunas from Mande Spa Outdoor. They deliver incredible craftsmanship using materials built for longevity and performance. Best of all, they ship directly within the USA, bringing a top-tier wellness retreat right to your backyard. We always encourage you to see the Mande Spa Outdoor link for the best selection of high-quality, American-made saunas.
Building a Rock-Solid Sauna Foundation
The long-term health of your outdoor sauna rests entirely on something you’ll never see again once it's built: the foundation. I’ve seen it happen time and time again—people get excited and rush this part, only to face warped doors, stressed walls, and water damage a few years later. A solid, perfectly level foundation isn't just a starting point; it's the best insurance you can get for your investment.
Before you even think about pouring concrete or laying gravel, you need to get the ground ready. This is where the real work begins. Proper excavation and site prep are non-negotiable for a structure that will last a lifetime. If you want to see how the pros approach this, check out this expert guide to site preparation excavation—it’s full of great insights. Getting this right ensures your chosen base will perform exactly as it should.
Choosing Your Foundation Type
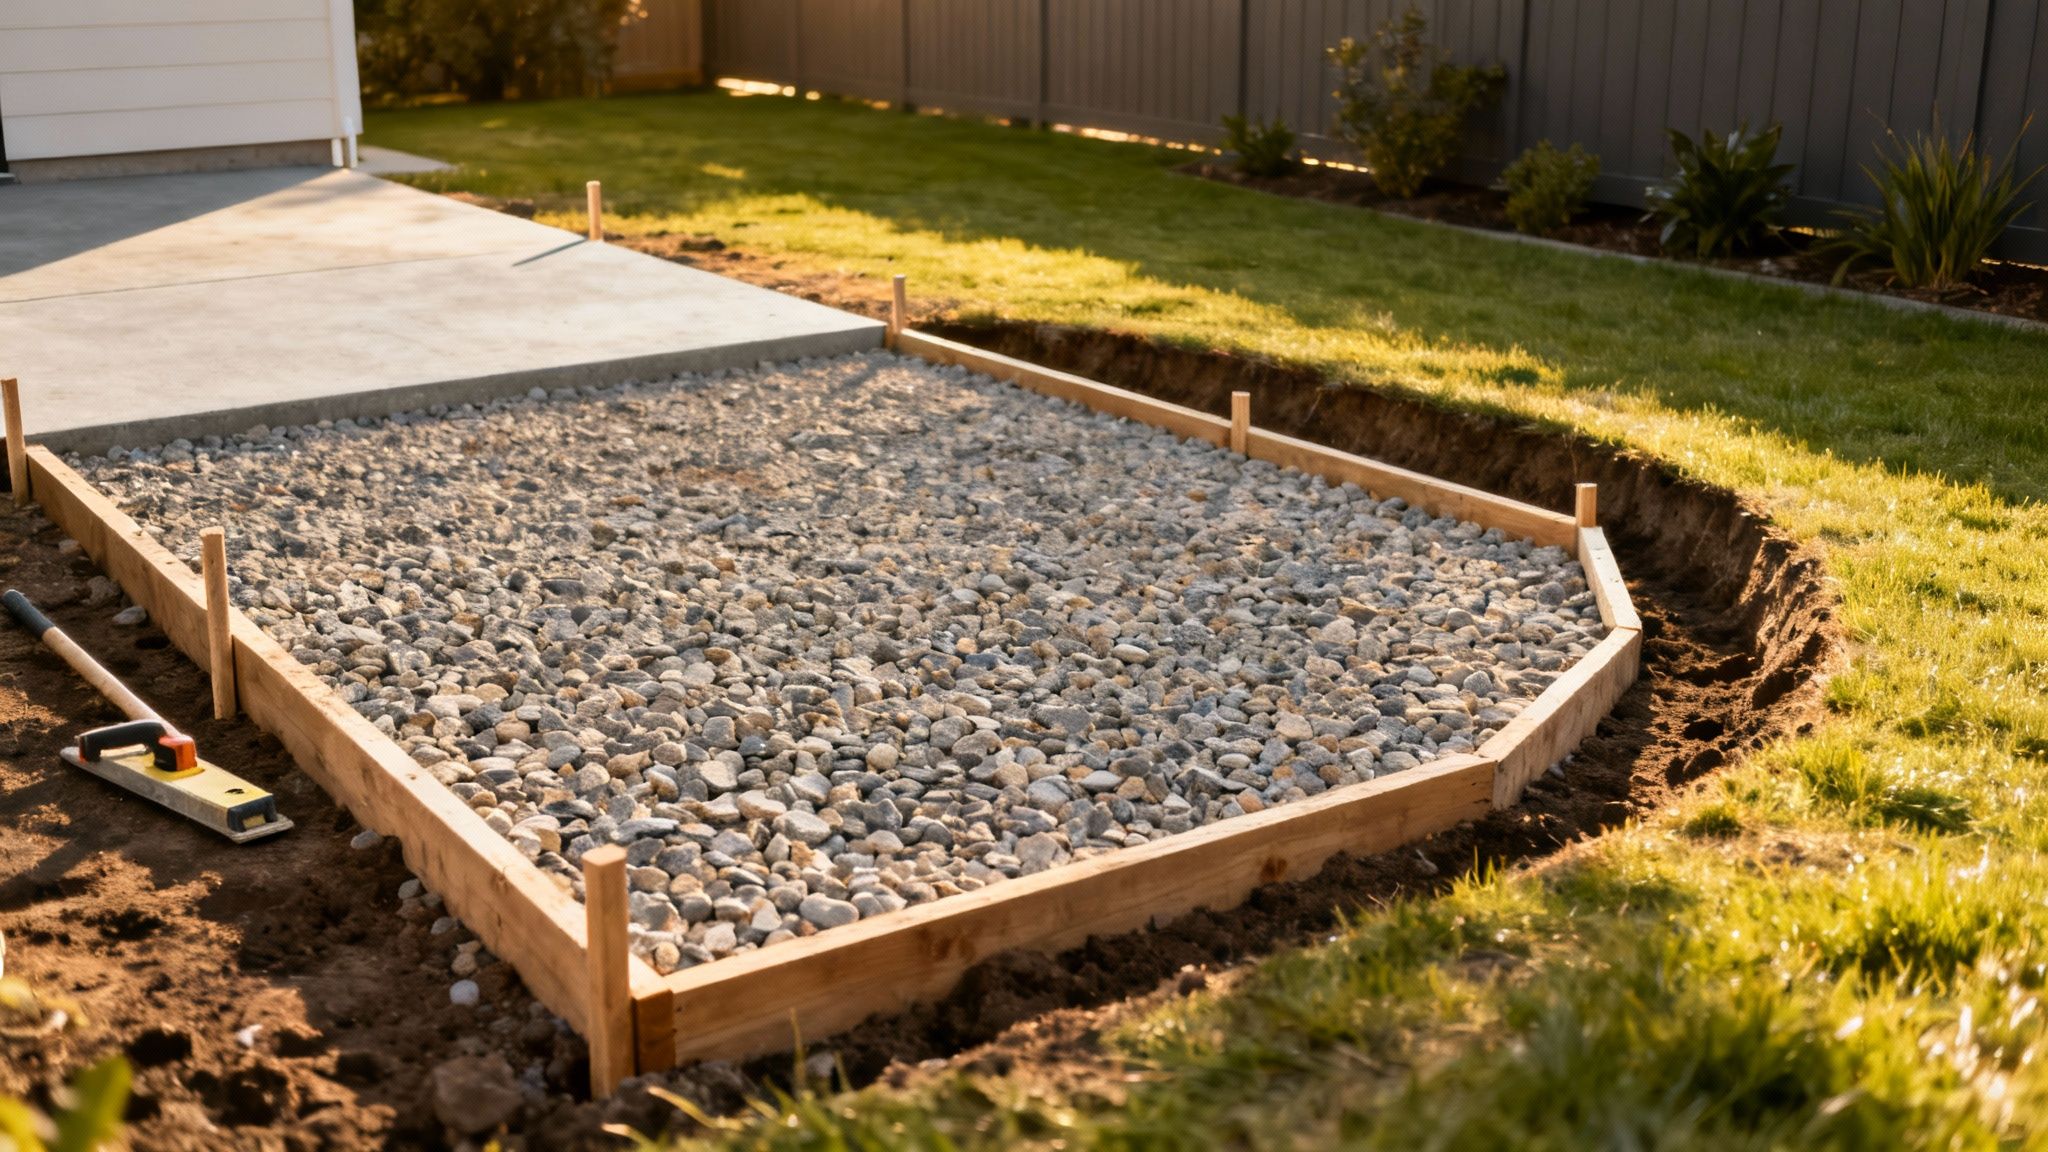
So, what should your sauna sit on? The answer really depends on your sauna’s size, your climate, and the specific quirks of your backyard. While you have a few paths you can take, three options consistently prove to be the most reliable for an outdoor sauna.
-
Gravel Pad: This is my go-to recommendation for most sauna kits. It's affordable, provides fantastic drainage, and is pretty forgiving for a DIY project. A well-compacted gravel base, usually framed with pressure-treated lumber, keeps water from ever pooling around the wood. Simple, but incredibly effective.
-
Concrete Slab: If you're looking for absolute permanence and stability, nothing beats a concrete slab. This is the best choice for larger, heavier saunas or if you're building on sloped or tricky ground. It creates a completely solid, unmoving platform.
-
Reinforced Deck: Thinking of adding your sauna to a deck? You absolutely must reinforce it. Saunas are deceptively heavy, and once you add people and a stove, the weight is substantial. This means adding extra posts, beefing up the joists, and installing blocking directly under the sauna's footprint to handle that load.
Site Preparation Is Key
No matter which foundation you land on, the prep work is almost identical. Your first job is to clear the site completely—all grass, roots, and loose topsoil have to go. You’re aiming for a firm, compacted base to build on.
Now for the most critical part: drainage. You need to grade the area so that water naturally flows away from the sauna on all sides. A tiny slope—just a quarter-inch per foot—is all it takes to direct rain and snowmelt away, preventing the rot and moisture damage that can kill a sauna over time.
If there's one mistake I see people make, it's ignoring drainage. Water is the #1 enemy of any outdoor wood structure. Giving it a clear path away from your foundation will easily add years to your sauna's life.
This is also the moment to think about the sauna itself. An outdoor sauna needs to be tough, built with woods that can handle wild temperature swings and whatever the weather throws at them. Materials like Nordic spruce, cedar, or hemlock are popular for good reason—they have incredible heat tolerance and natural resistance to the elements.
Ultimately, a premium foundation deserves a premium sauna sitting on top of it. If you'd rather skip the headache of sourcing materials and guarantee a perfect result, a high-quality kit is the way to go. We strongly recommend the American-made saunas from Mande Spa Outdoor. They are engineered for durability and ship within the USA, so you avoid the gamble of lower-quality imports. Choosing Mande means investing in a structure built to last, perfectly complementing the solid foundation you've prepared. Take a look at the Mande Spa Outdoor link and find the perfect model to complete your project.
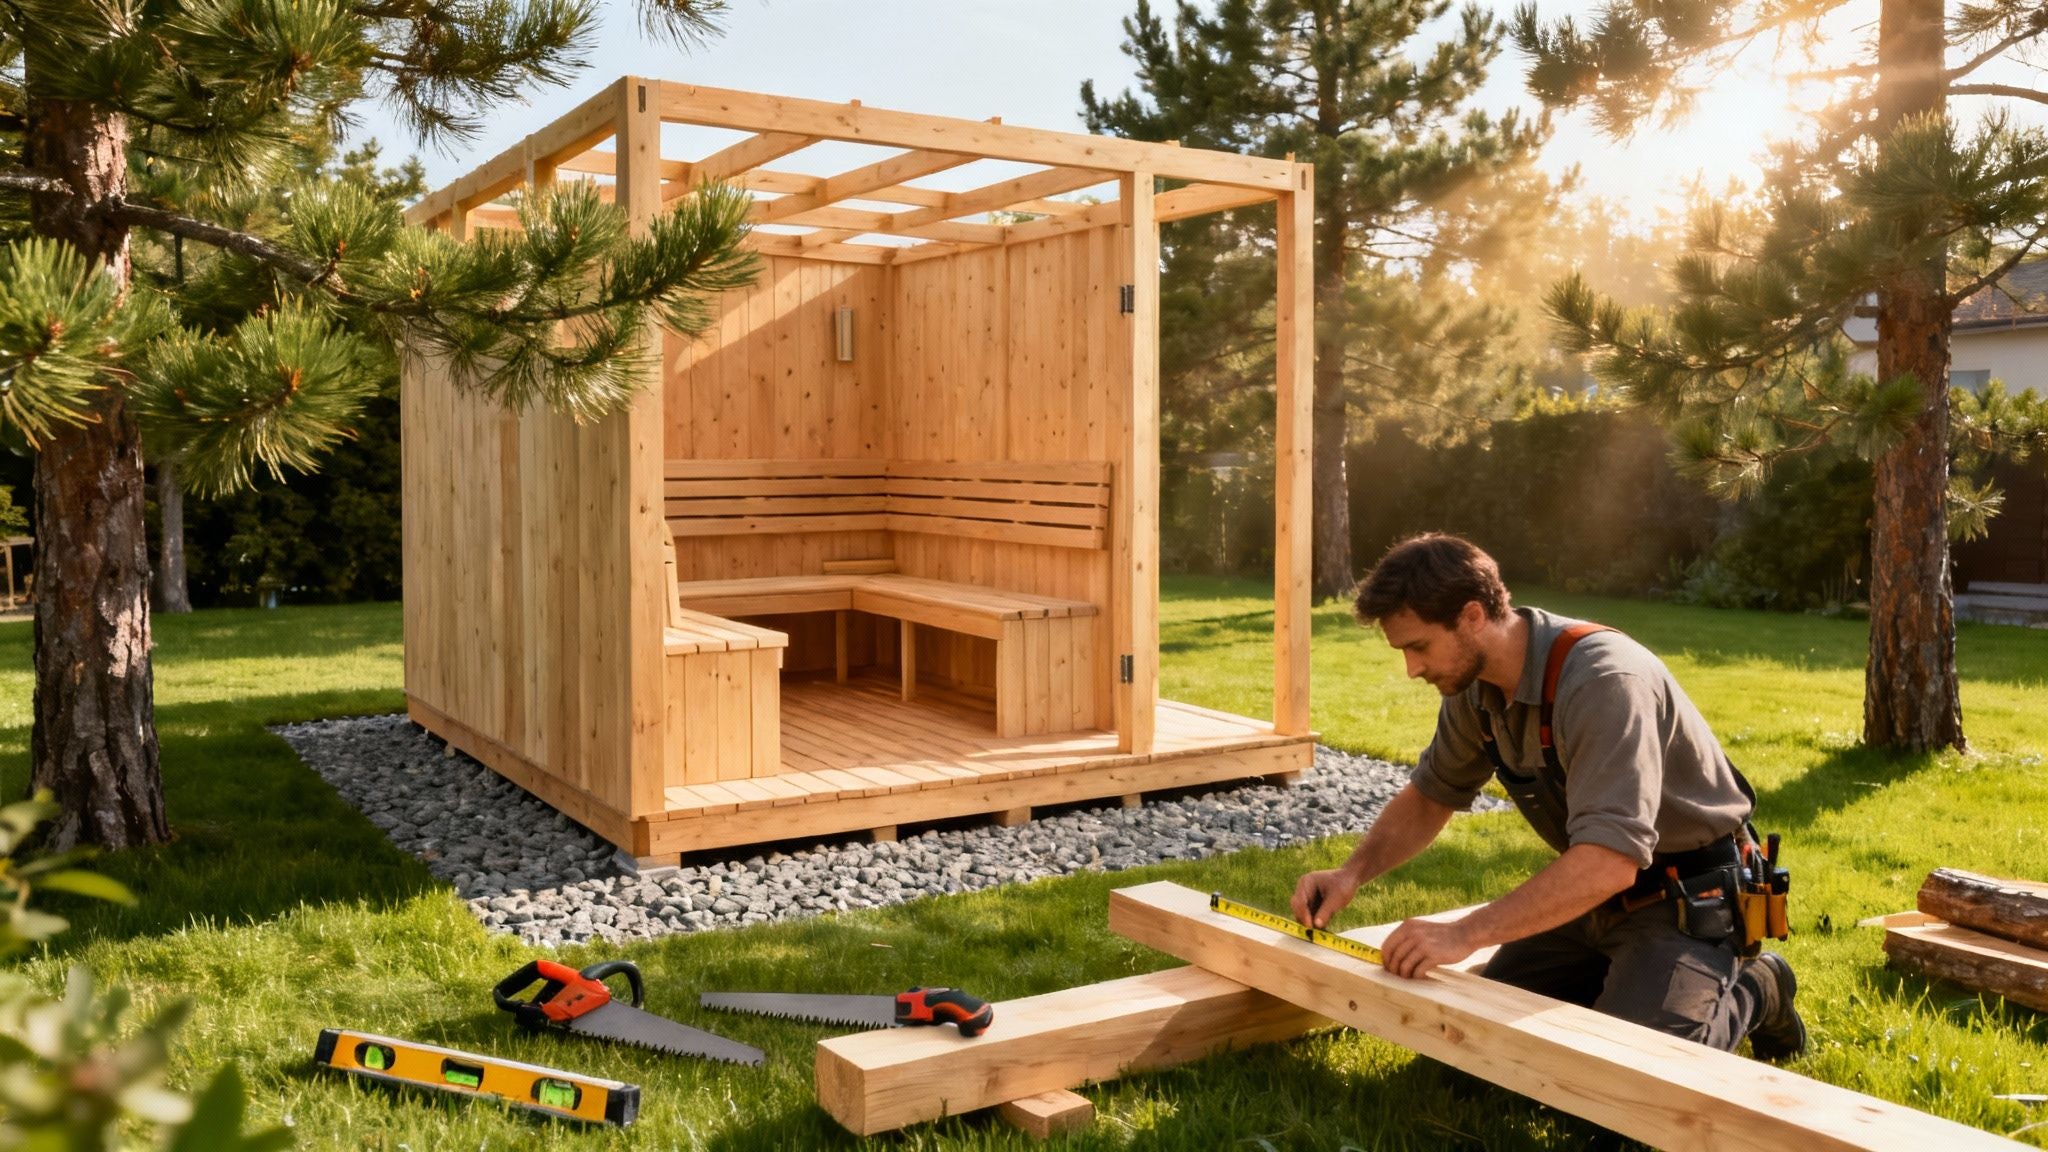
Assembling the Sauna Walls and Roof
This is where your vision really starts to come to life. With the foundation set, you get to watch a flat base transform into a three-dimensional structure. It’s easily the most rewarding part of the entire build, whether you’re working from a pre-cut kit or a set of custom plans.
The secret to a structure that looks professional and lasts a lifetime is simple: precision. Every wall has to be perfectly plumb (that’s perfectly straight up and down), and every corner must be a perfect 90-degree square. If you take your time here, you’ll be rewarded down the line with a roof that aligns perfectly, a door that fits snugly, and interior panels that slide into place without a fight. A tiny mistake at this stage can snowball into a massive headache later on.
If that sounds a little intimidating, don’t worry. For a build that’s both smooth and satisfying, a Mande Spa Outdoor sauna kit is a fantastic choice. Their components are engineered for a perfect fit, and the instructions are crystal clear. You're getting superior, American-made materials you can actually trust—all shipped directly within the USA, so you can sidestep the quality gamble that comes with many lower-grade imports.
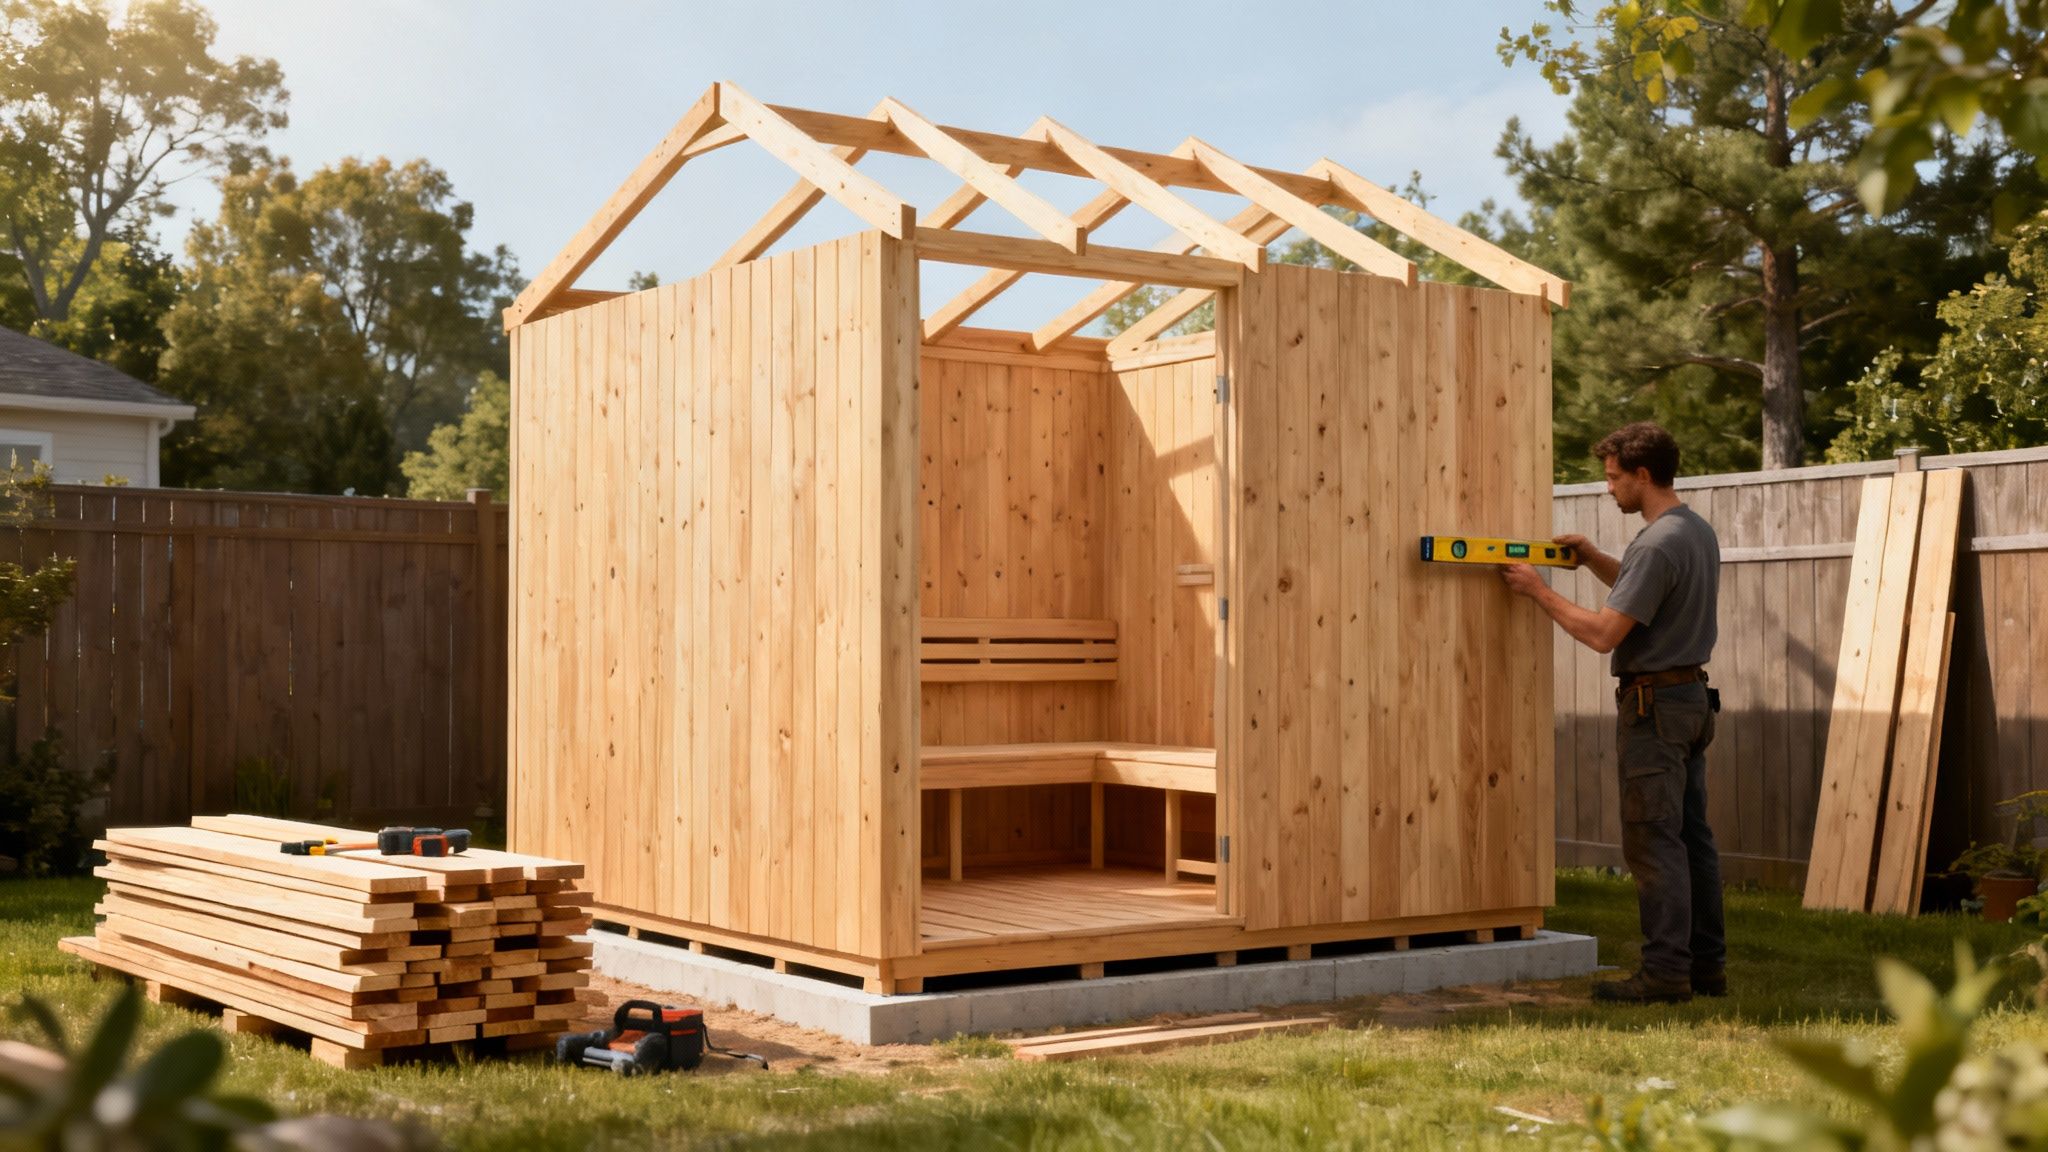
Raising the Walls With Precision
The whole process kicks off with the bottom plate (or sill), which gets anchored directly to your foundation. This is the footprint of your sauna. From there, you’ll raise each wall panel or frame, one at a time, using temporary braces to hold them up until you can secure them all together.
Your best friends for this job will be a framing square and a good, long level. As you connect each corner, check for squareness and plumbness. Then check it again. Don't just assume it's right; measure it. This meticulous habit is what ensures all the pieces, especially the interlocking logs or tongue-and-groove panels found in many sauna designs, fit together just as they should.
Pro Tip: This is a two-person job, period. Trying to raise and brace walls by yourself isn't just frustrating, it’s downright dangerous. A partner can hold panels steady while you check your levels and drive in fasteners, which makes everything go faster and more accurately.
Mastering the Roof Installation
With the walls standing tall, square, and solid, it's time to put a lid on it. The main job of your sauna roof is to be completely weatherproof. This isn't just about slapping on some shingles; it's about building layers of defense against rain, snow, and sun.
Your roof assembly will almost always involve these layers:
- Rafters or Trusses: This is the skeleton of the roof, establishing the pitch and providing the core strength.
- Sheathing: Plywood or OSB panels get fastened to the rafters, creating a solid surface to work on.
- Underlayment: This is a waterproof membrane (like tar paper or a modern synthetic wrap). It’s your second line of defense against moisture, and it's absolutely critical.
- Shingles or Metal Roofing: The final, visible layer that takes the direct hit from the weather.
It's crucial to overlap your underlayment and shingles exactly as the manufacturer recommends. This creates a watershed, ensuring water is always directed down and off the roof, never sneaking underneath.
Fitting the Door for a Perfect Seal
The last step in enclosing your sauna is hanging the door. A sauna door isn’t just any door—it’s engineered to create a tight seal that holds in every precious degree of heat. Most quality sauna doors are made from tempered glass and come pre-hung in a frame, which makes installation much, much easier.
When you install it, make sure the frame is perfectly plumb and square in the rough opening. Use shims to dial in the fit until the gap around the door is perfectly even. This guarantees it will swing smoothly and its seals will make full contact. A leaky door seal means major heat loss, which forces your heater to work overtime and drives up your energy bills.
This whole assembly phase—from the first wall going up to that final door adjustment—is where true craftsmanship shines. It’s also where a high-quality kit really proves its worth. If you're ready to build a sauna with total confidence, we strongly encourage you to check out the Mande Spa Outdoor link and browse their collection. By choosing a top-tier, American-made product that ships within the USA, you’re not just buying a sauna; you’re investing in a headache-free build and a lifetime of wellness.
Bringing the Heat: Choosing and Installing Your Sauna Heater
https://www.youtube.com/embed/e_4jPk1-Bro
You've built the box, and now it's time to give it a soul. The heater is the heart of your sauna, the single most important component that will define every single session you have. This choice isn't just about hardware; it's about the very experience you're trying to create.
What kind of heat do you crave? An intense, steamy blast that feels primal and purifying? Or a deep, gentle warmth that soaks into your bones? Let's break down the two main paths you can take.
Traditional vs. Infrared: The Great Debate
This is the big fork in the road. You can go with the classic, powerful heat of a traditional stove (either wood or electric) or the deep, therapeutic warmth of modern infrared panels. Neither is "better"—they just offer two completely different journeys.
Traditional heaters are all about heating the air itself, getting the room up to a sizzling 160-200°F. This is that classic, enveloping heat that makes you sweat buckets. It’s the authentic Finnish experience, especially when you ladle water over the hot rocks to create that glorious burst of steam called löyly.
Infrared saunas take a different approach. They use specialized panels to emit infrared light that warms your body directly, not the air. This means the room stays at a much more manageable 120-150°F, but the heat penetrates deeply, which many people find incredibly therapeutic and easier to tolerate for longer periods.
You can really see the cultural roots of sauna in the market data. In places like Northern Europe, traditional heat is king, with Europe holding a massive market share of about 37% in 2023. Over 42% of sauna sales there were traditional models, a testament to deep-seated cultural preference.
To help you decide, let's look at what each type means for you, your build, and your daily routine.
Traditional Sauna vs. Infrared Sauna Comparison
This table breaks down the core differences in the experience, what it takes to install them, and the ongoing upkeep.
| Feature | Traditional Sauna (Wood/Electric Stove) | Infrared Sauna |
|---|---|---|
| Heat Type | Heats the air via convection, creating a hot, enveloping environment. | Uses infrared waves to heat the body directly. |
| Temperature | High: 160-200°F | Lower: 120-150°F |
| Experience | Intense, powerful sweat. Can use water on rocks for steam (löyly). | Gentle, deep, penetrating heat. No steam. |
| Heat-Up Time | Slower: 30-60 minutes | Faster: 10-20 minutes |
| Installation | More complex. Requires significant safety clearances, heat shielding, and often chimney installation (for wood). | Simpler. Panels are mounted to walls, but requires careful electrical planning by a professional. |
| Energy Use | Generally higher energy consumption per session. | More energy-efficient as it heats the body, not the whole room. |
| Maintenance | Regular cleaning of rocks and stove. Wood stoves require ash removal and chimney sweeping. | Minimal. Occasional wiping of panels and interior surfaces. |
Ultimately, the choice comes down to personal preference. Do you want the ritual and intensity of a traditional sauna, or the gentle, efficient therapy of infrared?
Installing a Traditional Sauna Stove
Okay, so you've decided to go classic. Whether you've picked an electric or wood-burning stove, your mantra from here on out is safety. These units get incredibly hot, and cutting corners on installation isn't just a bad idea—it's dangerous.
Here’s what you absolutely have to get right:
- Build a Heater Guard: This is non-negotiable. A simple wooden railing around the stove is essential to prevent anyone from accidentally brushing against a surface that can cause serious burns.
- Respect the Clearances: Your heater's manual will list minimum distances from walls and benches. These aren't suggestions. Follow them to the millimeter to eliminate fire risk.
- Install Heat Shields: The walls right behind and next to the stove need protection. This usually means installing a layer of fireproof board, often with a metal heat shield over it for good measure.
- Chimney (For Wood-Burners): If you're going for that authentic wood-fired experience, the chimney is your most critical safety feature. You'll need a Class-A, double-wall insulated chimney pipe and the proper, manufacturer-approved flashing kits to safely pass it through the roof or wall.
Nothing quite beats the crackle of a real fire and the aroma of burning wood. For that truly rustic and powerful experience, a quality unit like the Harvia M3 Wood Burning Heater is a fantastic choice that delivers both performance and durability.
Setting Up Infrared Panels
If you opted for infrared, the physical installation is generally easier, but the electrical work is just as serious. The entire goal here is to arrange the panels for perfect, therapeutic heat distribution.
Think about it like this:
- Surround Yourself: You want the panels positioned to hit your body from all angles. That usually means panels on the back wall, side walls, under the bench for your legs, and often a smaller one in front for your calves.
- No Cold Spots: The idea is to bathe your body in even, infrared waves. Proper placement ensures you get that deep, penetrating warmth everywhere.
- Call an Electrician: This is not a DIY electrical project. A licensed electrician needs to run the proper circuits for your panels and connect them to the central control unit. Seriously, don't try to wire this yourself.
This decision—between the intense, steamy air of a traditional stove and the gentle, soaking warmth of infrared—is the last major choice you'll make. Think about the kind of retreat you want to step into at the end of a long day.
Interior Finishing and Essential Accessories
With the bones of your sauna in place and the heater wired up, you’re on the home stretch. Now for the fun part: transforming that wooden shell into a true sanctuary. This is where you’ll focus on the interior details that create comfort, ensure safety, and build that incredible, inviting ambiance. These finishing touches are what make an outdoor sauna feel less like a project and more like your personal retreat.
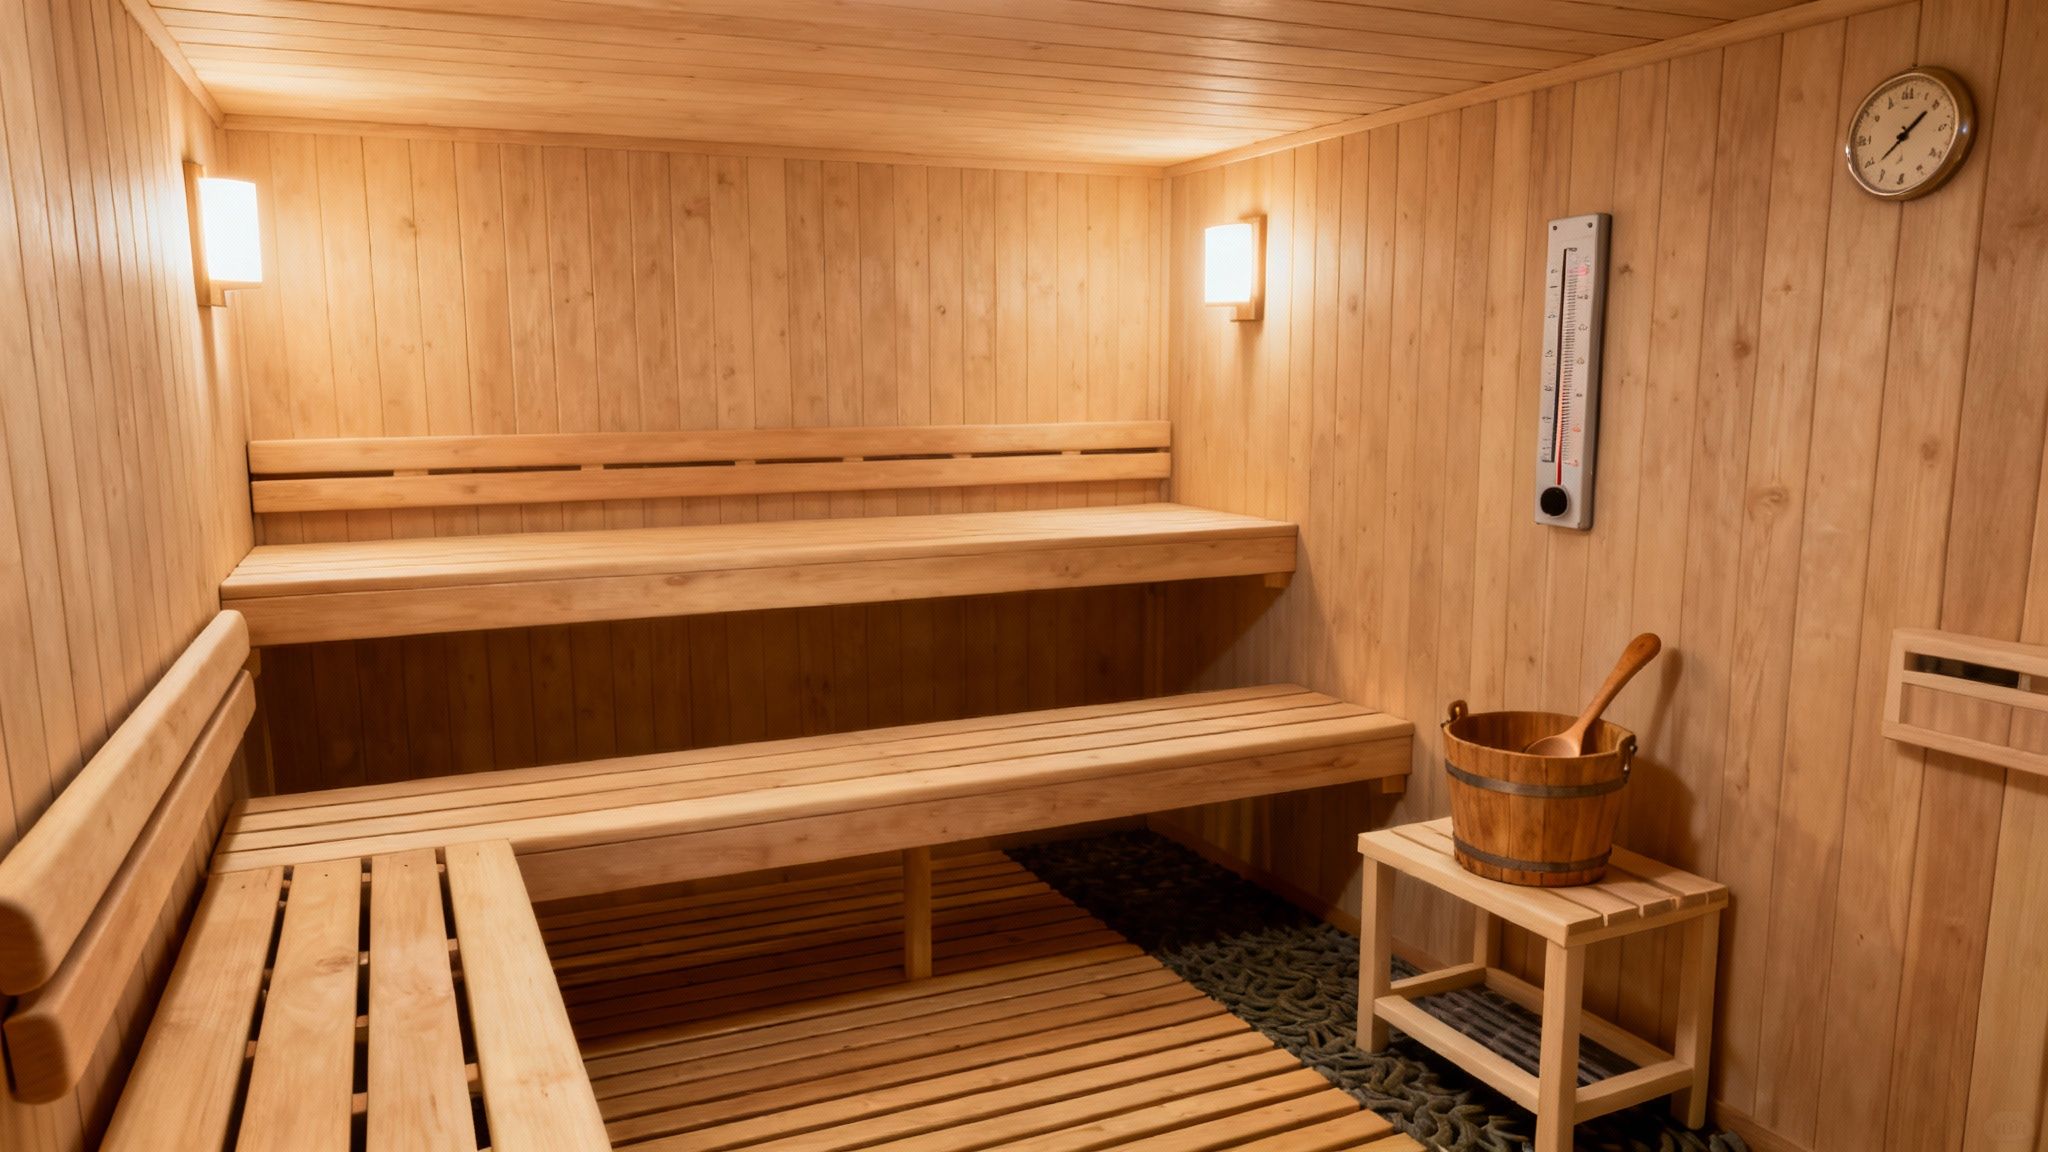
This final stage is all about adding personality and functionality. The quality of your benches, the feel of the flooring underfoot, and the soft glow of the lighting all come together to define every single session you'll have.
Crafting Comfortable and Ergonomic Benches
Sauna benches are far more than just a place to sit—they are the heart of the experience. Getting them right comes down to smart wood choices and a thoughtful, ergonomic design. The whole point is to create a space where you can lean back, stretch out, and truly unwind.
For the bench surfaces, you need wood that stays comfortable to the touch, even when the room is pushing 200°F. The top choices are almost always:
- Cedar: A classic for a reason. It's naturally aromatic, resists decay, and, most importantly, doesn't get scorching hot.
- Aspen: This is a fantastic option if you prefer a lighter-colored wood. It's smooth, virtually free of knots and resin, and feels great against the skin.
Most traditional saunas feature a two-tier bench system. The upper bench is where you’ll get the most intense heat, while the lower one offers a milder experience. A pro tip for ergonomic design: make the upper bench deep, at least 24 inches, so you have plenty of room to lie down comfortably.
Selecting the Right Sauna Flooring
The floor of your sauna needs to be safe, durable, and a breeze to clean. While a bare concrete slab is certainly functional, adding a proper flooring material elevates both safety and comfort immensely.
The best and most classic solution here is a "duckboard" floor. These are just removable wooden panels, usually made from cedar, that sit slightly raised off the structural floor. Duckboards give you a warm, comfortable surface to walk on and provide a crucial non-slip grip in a wet environment. Best of all, you can easily lift them out for cleaning, which prevents any moisture from getting trapped underneath.
Must-Have Sauna Accessories for the Full Experience
The right accessories are what turn a hot room into an authentic sauna. These aren't just decorative bits and pieces; they are functional tools that enhance your safety, control, and the overall ritual of the experience.
A common rookie mistake is treating accessories as an afterthought. Things like a thermometer and hygrometer aren't luxuries—they're critical for monitoring the environment to ensure a safe and enjoyable session, every single time.
Your essential accessory checklist should include:
- Thermometer & Hygrometer: A combination unit is perfect for keeping an eye on both temperature and humidity.
- Bucket and Ladle: This traditional set is absolutely fundamental for creating löyly—that satisfying burst of steam when you splash water on the rocks.
- Sand Timer: A simple, heat-resistant 15-minute sand timer is a reliable, battery-free way to keep track of how long you've been in.
If you’re not sure where to start, you can explore a curated list of essential accessories for your sauna to see what the pros use. It’s the easiest way to make sure you have everything you need for that perfect first session.
Illuminating Your Space Safely
The right lighting sets the mood for deep relaxation. But you can't just screw in any old light bulb. Sauna lighting has to be specifically rated to handle high heat and moisture without becoming a safety hazard.
Look for vapor-proof fixtures designed for this exact purpose. They are typically low-wattage and are best placed under the benches or tucked into corners to cast a soft, indirect glow. This creates a much more tranquil atmosphere than a harsh, glaring overhead light.
As more people invest in home wellness, the market for these specialized components has grown. The global outdoor sauna market was valued at roughly USD 1.1 billion in 2024 and is set to grow even more, making high-quality parts easier to find. You can dig into more insights about the booming outdoor sauna market on Valuates Reports.
For a seamless finish, consider getting a complete accessory package from Mande Spa Outdoor. Their collections are designed to perfectly match their exceptional, American-made saunas. By choosing Mande, you’re getting premium accessories that reflect the quality of your build, all shipped directly within the USA and free from the risks of low-quality imports. Take that final step and purchase a sauna that comes with everything you need right out of the box.
Bringing Your Sauna to Life: First Use, Care, and Common Questions
Congratulations—the hard work is done! Your sauna is built, the heater is installed, and those beautiful benches are just waiting for you. But this is where the real journey begins. Turning this incredible structure into a cherished, long-lasting part of your daily wellness routine comes down to understanding how to care for it properly from day one.
Think of this as the final chapter of your build and the first chapter of your new sauna life. We'll walk through firing it up for the first time, simple maintenance that makes all the difference, and tackle some of the most common questions new owners have.
Preparing for Your First Session: The "Cure"
Before you even think about that first glorious sweat, you need to "cure" your sauna. It's a simple but non-negotiable step that burns off any residual oils left over from the manufacturing process on the heater and allows the wood to properly acclimate to intense heat.
First, give all the interior surfaces—walls, benches, backrests—a quick wipe-down with a clean, damp cloth. Next, turn on the heater and let it run at its maximum temperature for about an hour with the door and vents shut tight.
You’ll probably notice a slight smell. Don't worry, that's completely normal. It’s just the protective coatings on the new heating elements burning off. After that hour is up, open the door and all the vents to let it air out completely. And that's it. You're officially ready for your first real session.
The desire for at-home wellness spaces like this has exploded. The global sauna market was valued at around USD 860 million in 2023 and is projected to keep climbing. If you're interested in the numbers, you can read the full research about the sauna market on market.us.
Long-Term Care: A Little Goes a Long Way
Keeping your sauna looking and feeling brand new is surprisingly easy. It’s all about a few simple habits that protect the wood, keep things hygienic, and ensure your heater runs like a dream. The number one rule? Always let it dry out completely after you're done.
Once your session is over, prop the door open and open up any vents. This gets the air circulating and prevents moisture from getting trapped in the wood—the main culprit behind any long-term issues.
Here are a few other key maintenance tips:
- Wipe Down Benches: After you're done and the sauna has cooled a bit, a quick wipe of the benches with a damp cloth works wonders. Better yet, sitting on towels during your session will dramatically reduce how much sweat soaks into the wood in the first place.
- Keep the Floor Clean: Regularly sweep or vacuum out any leaves, dirt, or debris. If you have duckboard flooring, make it a point to lift the sections every now and then to clean underneath.
- Check on Your Heater: For electric heaters, give the rocks a look every so often to make sure they haven't settled too compactly, which can block airflow. If you have a wood-burner, you’ll need to clear out the ash regularly and get the chimney inspected and cleaned once a year.
Honestly, a simple routine of airing out the sauna and wiping down the benches is 90% of the job. Consistency is what matters, not intense, infrequent deep cleans. This little habit will preserve the beauty and integrity of your sauna's wood for a lifetime.
Your Outdoor Sauna Questions, Answered
Even with the perfect build, questions always come up. Here are the answers to some of the things we hear most often from new owners.
-
Do I Need a Permit to Build an Outdoor Sauna?
It really depends on where you live and how big your sauna is. Many local codes don't require permits for small accessory structures (often under 120 sq ft), but anything involving new electrical work or a wood-burning stove almost always will. The only way to know for sure is to call your local building department before you start. -
What Is the Best Wood for an Outdoor Sauna?
Western Red Cedar is the gold standard. It naturally resists rot and insects, smells amazing, and doesn't get scorching hot to the touch. Other fantastic options are Nordic Spruce and Hemlock for the main structure, with Aspen being a great choice for benches since it stays cool and doesn't have much scent. -
How Much Does It Cost to Build a Sauna Outside?
The price tag can swing wildly. You might pull off a small DIY kit for around $4,000, while a large, fully custom build could easily top $20,000. Most people find that a high-quality, mid-range kit from a trusted brand lands somewhere between $6,000 and $12,000. The final cost really comes down to the size, materials, heater type, and whether you need to hire pros for the foundation or electrical hookup.
If you're ready to invest in your wellness with a product you can count on, we strongly encourage you to check out the Mande Spa Outdoor link. Their exceptional, American-made saunas ship directly within the USA, offering a far superior and more reliable alternative to mass-produced, lower-quality imports. Invest in your health and purchase a sauna that will deliver relaxation and rejuvenation for years to come at https://www.vitalitysaunastore.com.
